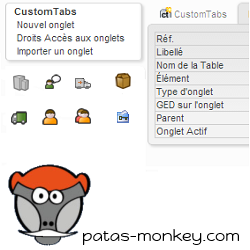
| The CustomTabs module allows you to add your own tabs to item cards.
The fields contained in these custom tabs replicate the functionality of Dolibarr's native additional fields.
Access to customTabs tabs can be configured according to user groups
The tab can be presented as a card or a list (with import/export functions)
Lists can be used as custom dictionaries
It is possible to use formatting templates
New: The number of fields and lines entered is displayed in the tab badge.
Presentation

| Fichier:Customtabs records-multiples1.png
|
Access to tab content is managed by group permissions for access, reading, editing, and deleting.
Tab content can be organized as a list or as a card. The page display can be customized with an HTML template.
|
|
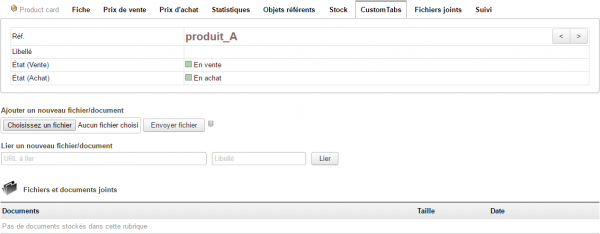
Custom tabs can contain a document manager. Combined with the tab access rights setting, this feature improves native document management in Dolibarr by limiting the view and access of user groups to documents.
|
The information stored in customTabs can be retrieved with the myList and ExtraODT modules.
Settings
CustomTabs has no specific settings. Access to its features is found in the menu items Patas-tools > CustomTabs
List of tabs present

The menu title allows you to display the list of customTabs present in Dolibarr.
When you update the module (deactivation/activation) this also deactivates the customtabs, the button at the bottom of the list allows you to reactivate them en masse.
Creating a New Tab
Fields on the Tab Creation Page
Open the new tab creation page from the Patas-M Tools > CustomTabs > New Tab menu link:

|
A tab can also be created from the tab list using the dedicated button
|
- Label: The label will be displayed as the name of the tab displayed on the item pages.
- Table Name: The information you enter in a tab is saved in a table. Enter its name here.

|
CustomTabs will automatically add a prefix to your table; simply enter the table name directly without a prefix. Furthermore, the table name must not contain spaces or special characters, nor be a word reserved for SQL language such as SELECT, FROM, DESC, etc.
|
- Element: Select from the drop-down list the element on whose records the tab will be added: third parties, contacts, products, warehouse, sales proposal, customer order, supplier order, customer invoice, supplier invoice, project, bank account, shipment, user, user group, member, VAT payment, or special expenses.
- {{Note|CustomTabs is interfaced with the Equipment and Factory modules. It is therefore possible to create custom tabs on equipment and production order records.
- Tab type: A tab can be a record or a list. Enter the type according to your needs:
- A list-type tab only allows one record to be modified according to the settings declared in the input fields.
- A record-type tab allows the recording of multiple successive records.
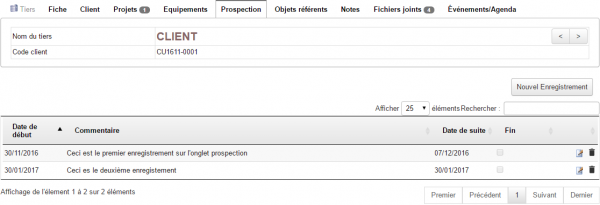
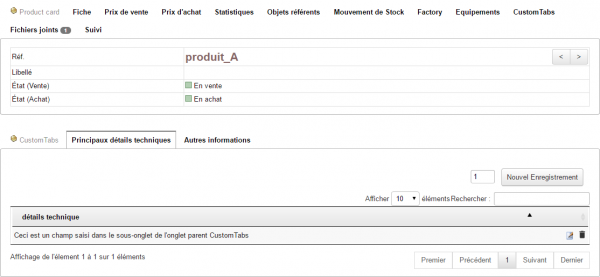
The tab type determines how data is displayed and saved. Depending on the type selected, the previously created tab will then display:
|
- List tab: only one record can be entered and can be edited.
|

|
- Card tab: multiple records can be entered.
|
|
- Parent: It is possible to create sub-tabs. Creating a sub-tab requires the prior creation of a parent tab, which you can select here.
- Creating sub-tabs is similar to creating a new tab, requiring the selection of a parent tab.

|
A parent tab can only be of type card. It is not possible to create a sub-tab of another tab of type list
|
- Configuring the sub-tab and the fields it will contain will work the same way as creating a new tab.
- The sub-tab will then appear in the parent tab's file according to the permissions granted to the user groups.
|
Example of creating a custom tab
Creation page
Let's create a tab to record third-party prospecting tracking.

|
Open the new tab creation page and enter the following data:
|
Complete the first step of creating the tab by clicking the Create button.

|
Once the tab is created, several new fields are displayed and can be modified when editing the tab:
- EDM (Electronic Document Management): By enabling the EDM option, you can store documents on the tab. Access to these documents will be limited to authorized groups. Please note that the EDM function is only available for screen-type custom tabs.
- Order BY list: By default, the list is sorted on the first field. You can customize the sorting by entering it. Please note that the orderby function is only available for list-type custom tabs.
- Active tab: After its creation, a tab is inactive by default. Change its status to enable its display on the tabs of the items selected in the previous step.
|

|
The Edit button will allow you to edit the tab to modify various information.
|

|
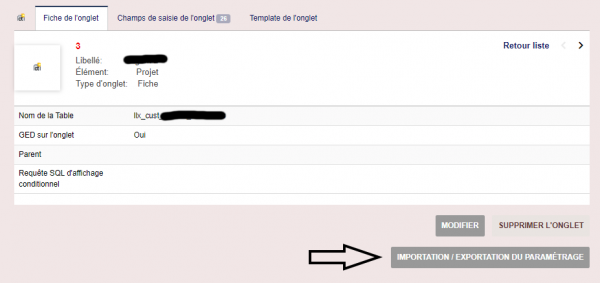
The Import/Export button for the tab will generate the XML file that you can edit before copying and exporting it.
|

|
The Delete button will delete the tab from your database. Always deactivate a tab before deleting it. If you delete the tab without first deactivating it, it will remain in your database and on the item cards, but will be emptied of its content
|
Tab Input Fields
From the page displayed after creating the additional tab, click the "Tab Input Fields" tab.
The elements entered here will be the content lines of the custom tab added to the records of the element selected during creation.
To add a new field, click the New Attribute button.
Creating tab fields follows the procedure for creating and operating additional fields native to Dolibarr.
In the case of calculated fields, it will be possible to retrieve the id of the element to which the tab is associated with with the fk_element field
Continue creating the input fields using the following template:

To make the tab accessible from the Dolibarr menus, simply modify it to make it active and configure the access rights (see Configuring access rights to tabs below).
Tab Template

|
Entering a template is optional. If no template is entered, the default display is used. From the "Tab Template" tab, you can define your own display using HTML code.
|

|
The screen displays a list of fields on the tab, which you can copy and paste.
Tip: Drag and drop can be used to copy the field code into the template's input area.
|

|
To add edit and delete icons to the template, use the #EDITBTN# and #DELETEBTN# tags
|

|
The template is interpreted differently depending on the tab type: either block by block on a list tab, or for the entire page on a card tab
|
For example, you can enter the following template:
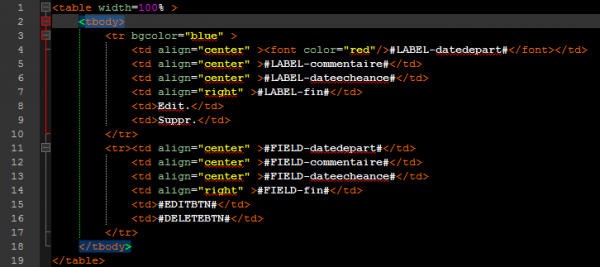
And you will get:

or


|
If a field present in the table is not defined in the template, it will not be displayed
|
Import/Export Tab
On the tab page, you can export the tab's settings and its fields to an XML file.
You can then update a tab in the same way or import a new tab from scratch (see below in the documentation).
Calculated Fields and Concatenation
It is not necessarily easy to explain the use of calculated fields in customTabs, which is why I put here two examples of complex cases on calculated fields.
implode('/', array($object->array_options['options_urlcomp'], $objectoffield->array_options[$objectoffield->rowidextrafields]['options_no_contract'] ))
implode('-', array( ($tmpsoc = new Societe($db)) && ($tmpsoc->fetchNoCompute($objectoffield->array_options[$objectoffield->rowidextrafields]['options_soc'])) ? $tmpsoc->array_options['options_urlcomp']: '---', $objectoffield->array_options[$objectoffield->rowidextrafields]['options_no_contract']))
I would like to point out that it is possible to ask me for support services to carry out this type of thing.
User Access and Permissions on Tabs
Configuring Tab Access Rights
From the secondary menu entry Patas-Tools > CustomTabs > Tab Access Rights, configure user group access:

There are four access rights:

|
The permissions vary depending on the tab type. On a form tab, the permissions for adding and deleting fields in the tab are not enabled.
|
Comportement selon les droits d'accès
Bloqué en accès ( ) )
Un message d'alerte préviendra l'utilisateur qu'il n'a pas les habilitation nécessaire pour voir le contenu de l'onglet.
Accès en lecture mais bloqué en modification (  ) )
Les utilisateurs du groupe pourront afficher les champs de l'onglet, mais ne pourront pas en modifier le contenu.
Accès en lecture et Accès en modification (  ) )
Les utilisateurs du groupe pourront afficher l'onglet, son contenu et le modifier.
Requête SQL d'affichage conditionnel
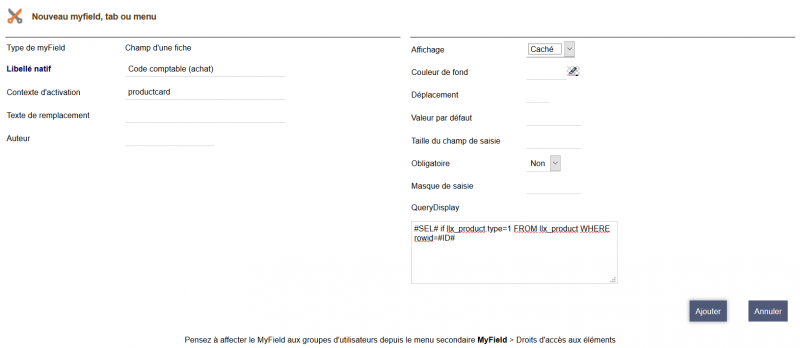
La requête de traitement va conditionner l'affichage des champs selon la correspondance de l'objet à la requête. Il est alors possible, par exemple, d'afficher des champs différents selon que l'objet est un produits ou un service.
Il est possible de transmettre en paramètre deux valeurs :
- #ID# : l'id de l'objet principale de la page
- #USERID# : l'id de l'utilisateur actif
Fonctionnement
Saisissez ici la requête d'affichage applicable au champs sur l'exemple suivant :
- SEL# permet de remplacer le SELECT de la requête SQL qui sera bloqué par la sécurité native de Dolibarr (SQL Injection)
#SEL# IF(fk_product_type=1, 1, 0) AS `read`, IF(fk_product_type=1, 1, 0) AS `write` FROM llx_product WHERE rowid=#ID#;
read permet d'autoriser ou non l'affichage globale du champ
write permet d'autoriser ou non sa modification (pas nécessaire dans le cas d'un bouton un un onglet...)
Si la valeur est à 0, le champs est caché, dans le cas contraire il est affiché
Attention, si on laisse le paramètre du champs à caché, il n'apparaitra pas quel que soit la valeur
Exemple
Avec le myfield suivant
| On obtient la fiche suivante sur un produit

|
Tandis que sur la fiche d'un service

|
Autres fonctionnalités
Import/export d'un onglet et de son contenu
Import/export du paramétrage d'un onglet
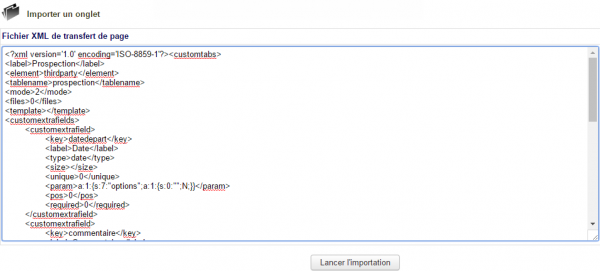
Il est possible d'enregistrer un onglet et ses champs en important un fichier XML.
Depuis la page Outils Patas-M > CustomTabs > Importer un onglet, collez le fichier XML dans la zone de saisie et cliquez sur le bouton Lancer l'importation :
Activez l'onglet depuis sa fiche et il sera ajouté sur les fiches de vos éléments.
Cette fonctionnalité d'import permet d'éviter les étapes de création d'un onglet personnalisé. Pour importer le contenu de champs de saisie d'un onglet personnalisé, utilisez la fonctionnalité d'import de contenu.
Import et export du contenu d'une liste
Il est possible d'importer le contenu des champs d'un onglet en important un fichier .csv.
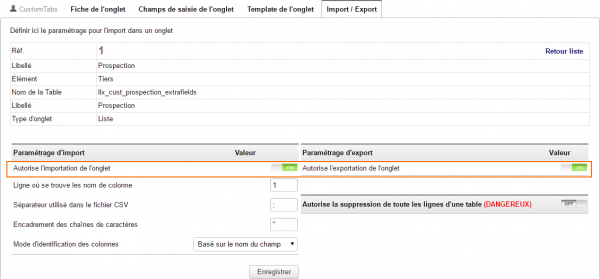
Les importations et exportations d'un onglet nécessitent l'activation de ces fonctionnalités dans l'onglet Import/export de la fiche des onglets personnalisés

|
L'import/export de contenu d'un onglet n'est possible que pour les onglets de type liste
|
|
Activer d'abord la fonctionnalité d'import du contenu de l'onglet
|
Déclarez ensuite la ligne du fichier .csv ou se trouve le nom de la colonne, le séparateur de champ utilisé, le caractère utilisé en tant que séparateur du contenu des champs et le mode d'identification des colonnes :
- Basé sur le libellé des champs : La première ligne de votre fichier .csv mentionnera le libellé des champs tel qu'affiché à l'écran. Dans notre exemple, Date de début, commentaire…
- Basé sur le nom des champs : La première ligne de votre fichier .csv mentionnera le code des champs tel qu'enregistré pour chacun des champs de saisie. Dans notre exemple, début, commentaire…
- Basé sur l'ordre des champs : Les champs de l'onglet seront remplis par les données telles qu'elle sont ordonnées dans votre fichier .csv.

|
Le paramétrage "Autorise la suppression de toute les lignes d'une table (DANGEREUX)" ajoutera un bouton de suppression de toutes les lignes d'un customTabs.
|
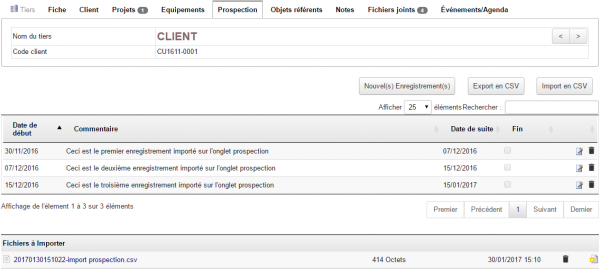
Prenons le fichier .csv suivant :
Depuis l'onglet de la fiche tiers, cliquez sur le bouton Import csv :
Sélectionnez le fichier à importer, et Ajoutez le fichier.
Cliquez ensuite sur l'icone  pour lancer l'importation pour lancer l'importation
Le customTabs affichera alors :
Dictionnaires
CustomTabs permet la création de dictionnaires de valeurs à afficher dans des champs supplémentaires des fiches des éléments.

|
Cette fonctionnalité est possible pour les onglets de types Liste seulement
|

|
Créez un nouvel onglet de type Liste pour l’élément Dictionnaire et notez le nom donné à la table
|

|
Dans l’onglet champs de saisie de l’onglet, créer 2 champs
|
Activez l'onglet, paramétrez les droits d'accès des groupes d'utilisateurs.
|
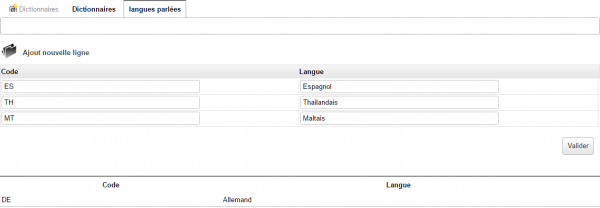
Dans le menu secondaire customTabs > Dictionnaires, ouvrez l'onglet nouvellement créé et ajoutez-lui autant de champs que nécessaires
|
|
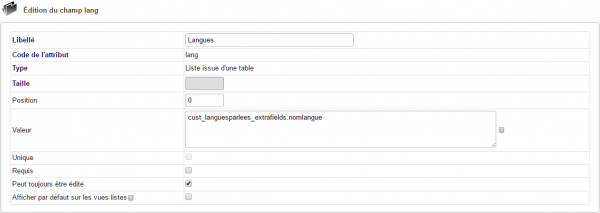
Dans la configuration des modules (tiers et contacts dans notre exemple), créer un champ supplémentaire dans la fiche de l’élément souhaité (contact) en sélectionnant le type liste issue d’une table ou liste à cocher issue d'une table. Pour le champ Valeur, reprendre le nom de la table créée à l’étape précédente et le compléter du nom du champ, soit cust_languesparlees_extrafields:nomlangue.
|
Vos fiches afficheront alors le nouveau champ supplémentaire :

|
L'avantage d'utiliser les dictionnaires de CustomTabs est la rapidité de modification et duplication. Ajoutons la langue anglaise dans notre dictionnaire customTabs : La modification apportée au dictionnaire s'applique à tous les champs de toutes les fiches qui proposent ses valeurs.
|
et les fiches de vos contact afficheront :
Gestion des ODT
Il est possible de récupérer les valeurs saisies sur les customTabs de type fiches dans les modèles ODT
pour cela il faut utiliser la balise {cust_<nom de l'onglet>_<nom de l'attribut>}
Questions fréquentes
Général
Ce chapitre répertorie les difficultés rencontrées avec le module. Vous y trouverez donc des éléments de réponse quant à son utilisation.
Si vous rencontrez une autre erreur que celles décrites ci-dessous lors de l'utilisation de ce module :
- Désactivez et réactivez le module,
- Vérifier sur le ChangeLog si une nouvelle version a été publiée,
- Ré-installez/mettez à jour le module,
- Vérifiez que le remplacement de fichiers natifs de Dolibarr ne soit pas nécessaire au bon fonctionnement du module.
- Vérifiez qu'aucune incompatibilité avec un autre module ne soit indiquée. Le cas échéant, suivez nos préconisations.
Si, malgré ces manipulations, l'erreur persiste, contactez-nous en utilisant le formulaire dédié (http://docs.patas-monkey.com/support/).
Ce formulaire est le mode de contact à privilégier pour toute difficulté d'utilisation ou remontée de bug. Aussi, nous vous remercions de ne pas multiplier les canaux d'échange pour un même objet.
Onglets n'apparaissant pas/plus sur vos fiches
- Suite à une mise à jour du module ou des onglets eux-mêmes, même si vos onglets indiquent qu'ils sont activés, vous devrez les réactivez en entrant en édition du champ onglet actif et en enregistrant à nouveau.
- Il est également possible d'effectuer cette manipulation pour tous les onglets en un clic avec le bouton Réactivation des onglets actifs de la liste des customTabs accessible depuis les menus Patas-tools > CustomTabs > CustomTabs :
|
