« MyList/en » : différence entre les versions
Page créée avec « depending on the type of fields created, other fields may appear for modification. » |
Aucun résumé des modifications |
||
| (23 versions intermédiaires par le même utilisateur non affichées) | |||
| Ligne 13 : | Ligne 13 : | ||
The myList Module allows you to create your own personalized lists from the information contained in your database and make them accessible from the Dolibarr menus. The information is retrieved by SQL query. | The myList Module allows you to create your own personalized lists from the information contained in your database and make them accessible from the Dolibarr menus. The information is retrieved by SQL query. | ||
[[file:mylist_Liste_affichee_en.png|600px]] | |||
[[file: | |||
From the custom lists, different actions can be performed from additional processing requests (deletion, update, etc.). | From the custom lists, different actions can be performed from additional processing requests (deletion, update, etc.). | ||
[[file:mylist_Liste_traitement_en.png|600px]] | |||
[[file: | |||
MyList comes with three list import files to inspire you to create your own lists: contacts to call back, list of unpaid invoices and turnover. | MyList comes with three list import files to inspire you to create your own lists: contacts to call back, list of unpaid invoices and turnover. | ||
| Ligne 28 : | Ligne 24 : | ||
{| class="wikitable" | {| class="wikitable" | ||
|- style="vertical-align:top;" | |- style="vertical-align:top;" | ||
| [[file:mylist_Champs-mylistmore- | | [[file:mylist_Champs-mylistmore-ecran_en.png|600px]] | ||
| | | | ||
Sums and averages of the calculated fields of myList on screen and on edition | Sums and averages of the calculated fields of myList on screen and on edition | ||
|- style="vertical-align:top;" | |- style="vertical-align:top;" | ||
| [[file:mylist_Champs-mylistmore- | | [[file:mylist_Champs-mylistmore-resultat_en.png|600px]] | ||
| | | | ||
PDF editions | PDF editions | ||
| Ligne 46 : | Ligne 42 : | ||
{| class="wikitable" | {| class="wikitable" | ||
| [[file: | | [[file:mylist_Configuration_en.png|600px]] | ||
| style="vertical-align:top;" | | | style="vertical-align:top;" | | ||
| Ligne 61 : | Ligne 57 : | ||
*User and group permissions | *User and group permissions | ||
{| class="wikitable" | {| class="wikitable" | ||
| [[file:myliste_Permissions- | | [[file:myliste_Permissions-utilisateurs.png|600px]] | ||
| style="vertical-align:top;" | Access to the module's features can be restricted to users and groups, from their profile then Permissions tab, according to the permissions | | style="vertical-align:top;" | Access to the module's features can be restricted to users and groups, from their profile then Permissions tab, according to the permissions | ||
|} | |} | ||
| Ligne 86 : | Ligne 82 : | ||
Open the list creation page from the menu link '''Patas-M Tools > Mylist > New list''': | Open the list creation page from the menu link '''Patas-M Tools > Mylist > New list''': | ||
[[file:mylist_Page_nouvelle_liste.png|600px]] | [[file:mylist_Page_nouvelle_liste.png|600px]] | ||
{| class="wikitable" | {| class="wikitable" | ||
| Ligne 224 : | Ligne 218 : | ||
This feature is related to the setting of key type fields (<code>rowid</code> and <code>fk_xxx</code>) for list fields of type text, list and status. | This feature is related to the setting of key type fields (<code>rowid</code> and <code>fk_xxx</code>) for list fields of type text, list and status. | ||
It allows you to make it clickable and/or filterable by drop-down list. | |||
Feeding this field requires knowledge of the tables and the organization of the classes of the different elements of Dolibarr. | |||
Some examples of parameter formation: | |||
* 1st case: list from a table | |||
* | Table: <code>c_typent</code> (without the prefix) | ||
Table : <code>c_typent</code> ( | Key: <code>id</code> | ||
Label: <code>libelle</code> | |||
Parameter to indicate in the configuration of the myList field: <code>c_typent:id:libelle</code> | |||
* 2nd case: make the list results clickable | |||
* | |||
{| class="wikitable" | {| class="wikitable" | ||
|- style="vertical-align:top;" | |- style="vertical-align:top;" | ||
| [[file:new_mylist_field_param_conctact.png|600px]] | | [[file:new_mylist_field_param_conctact.png|600px]] | ||
Example of entering a clickable field for contacts | |||
| | | | ||
:: | ::Name of the class of the element to make clickable: <code>Invoice:</code> | ||
:: | ::Path of the file defining the class: <code>/compta/invoice/class/invoice.class.php</code> | ||
:: | ::Name of the table: <code>:invoice</code> | ||
:: | ::Field to display: <code>field_name</code> | ||
:: | ::Parameter to indicate in the configuration of the myList field: <code>Invoice:/compta/invoice/class/invoice.class.php:invoice:field_name</code> | ||
[[file:new_mylist_field_display_contact.png|300px]] | |||
[[file:new_mylist_field_display_contact.png|300px]] | Result displayed for the example opposite for contacts | ||
|} | |} | ||
* Most frequently used parameters: | |||
* | ::Third party: <code>Company:/company/class/company.class.php</code> | ||
:: | ::Contact: <code>Contact:/contact/class/contact.class.php</code> | ||
::Contact : <code>Contact:/contact/class/contact.class.php</code> | ::Users: <code>User:/user/class/user.class.php:user:lastname</code> | ||
:: | ::Product: <code>Product:/product/class/product.class.php</code> | ||
:: | ::Sales proposal: <code>Propal:/comm/propal/class/propal.class.php</code> | ||
:: | ::Customer order:<code>Order:/order/class/order.class.php:order:ref</code> | ||
:: | ::Customer invoice: <code>Invoice:/accounting/invoice/class/invoice.class.php</code> | ||
:: | ::Project: <code>Project:/project/class/project.class.php</code> | ||
:: | ::Tasks: <code>Task:/project/class/task.class.php</code> | ||
:: | ::Contract: <code>Contract:/contract/class/contract.class.php</code> | ||
:: | ::Intervention: <code>Fichinter:/fichinter/class/fichinter.class.php</code> | ||
::Intervention : <code>Fichinter:/fichinter/class/fichinter.class.php</code> | ::Shipping: <code>Shipping:/shipping/class/shipping.class.php</code> | ||
:: | ::Supplier order: <code>SupplierOrder:/supplier/class/supplier.order.class.php</code> | ||
:: | ::Supplier invoice: <code>SupplierInvoice:/supplier/class/supplier.invoice.class.php</code> | ||
:: | ::Warehouse: <code>Warehouse:/product/stock/class/warehouse.class.php</code> | ||
:: | ::Event: <code>ActionComm:/comm/action/class/actioncomm.class.php</code> | ||
:: | ::Bank: <code>Account:/compta/bank/class/account.class.php</code> | ||
:: | ::Category: <code>Category:/categories/class/categorie.class.php</code> | ||
:: | |||
* for text type fields containing a url, it is possible to make them clickable by adding the "url" parameter | |||
* | |||
< | <span id="Champ_de_type_catégorie"></span> | ||
==== | ==== Category type field ==== | ||
for category type fields, the following settings must be made: | |||
{| class="wikitable" | {| class="wikitable" | ||
|- style="vertical-align:top;" | |- style="vertical-align:top;" | ||
| [[file:mylist_categorie_field_contact.png|600px]] | | [[file:mylist_categorie_field_contact.png|600px]] | ||
| | | | ||
* | * field name: the field that links the list to the category | ||
* | * Field parameter: the value before the separation corresponds to the name of the category table (in the example llx_categorie_member) the second value corresponds to the link to the field entered in the field name (here fk_element) | ||
Here are some other examples of category parameters: | |||
* supplier:fk_soc | |||
* | * company:fk_soc | ||
* | |||
* contact:fk_socpeople | * contact:fk_socpeople | ||
|- style="vertical-align:top;" | |- style="vertical-align:top;" | ||
| [[file:mylist_categorie_result.png|600px]] | | [[file:mylist_categorie_result.png|600px]] | ||
| | | It is then possible to select several categories for filtering. | ||
If you use the check mark, filtering several categories will be done by OR instead of AND | |||
|} | |} | ||
====Field filtering ==== | |||
==== | :Filtering options on field values. | ||
: | :{| class="wikitable" | ||
:{| class="wikitable" | |- style="background-color:orange; font-weight:bold;" | ||
|- style="background-color:orange; font-weight:bold;" | | Duration, Number, Sum, Price | ||
| | | Result | ||
| | |- | ||
|- | | < 20000 | ||
| < 20000 | | numbers < and = to 200000 | ||
| | |- | ||
|- | |||
| 200000-300000 | | 200000-300000 | ||
| | | numbers from 200000 to 300000 inclusive | ||
|- style="background-color: orange; font-weight:bold;" | |- style="background-color: orange; font-weight:bold;" | ||
| Date | | Date | ||
| | | | ||
|- | |- | ||
|2008 | |2008 | ||
| | | all dates of 2008 from 01/01 to 31/12 inclusive | ||
|- | |- | ||
| 2006-2009 | | 2006-2009 | ||
| | | all dates from 01/01/2006 to 31/12/2009 inclusive | ||
|- | |- | ||
| >2004 | | >2004 | ||
| | | all dates greater than (or =) 01/01/2004 | ||
|- | |- | ||
| 20060401 | | 20060401 | ||
| | | All items corresponding to the day entered in YYYYMMDD format | ||
|} | |} | ||
::Boolean, | ::Boolean, List, Status: in the case of a Boolean filter, three values can be selected in the list: | ||
::: | :::empty: the field is not filtered | ||
:::<code> | :::<code>true</code>: selects values entered as "true" | ||
:::<code> | :::<code>false</code>: selects values entered as "false" | ||
::: | :::In other cases, it depends on the additional setting of the field. | ||
==== | ====Remarks on filtering==== | ||
* | * A Check format zone is not filterable | ||
* In the case of filtering by a user's company (for example to filter a list on invoices) you must use the #SOCID# value as the default value on a field containing the company key | |||
* | * In the case of filtering by the default user, you must use the #USERID# value as the default value on a field containing the user key | ||
* | |||
====Calculated Fields==== | |||
=== | It is possible to display a calculated field in the list from php code entered in the additional parameters. | ||
{| class="wikitable" | {| class="wikitable" | ||
| [[file:mylist_Exemple_doleval.png|600px]] | | [[file:mylist_Exemple_doleval.png|600px]] | ||
| style="vertical-align:top;" | | | style="vertical-align:top;" | this type of fields uses the native operation of additional attributes (extrafields) and the dol_eval() function. | ||
|} | |} | ||
===Management of specific keys (<code>rowid</code>, <code>fk_statut</code>)=== | |||
* Rowid fields: rowid fields have a particular operation in myList, associated with parameters, they allow to create a link to the element of which they are the key. | |||
* | :Making a field clickable is probably the most complex problem of myList because it involves understanding a little of the Dolibarr architecture. | ||
: | :First of all, it is necessary to locate in the Dolibarr directories where the class of the element that we want to call is located and what it is named in the file | ||
: | :If, for example, we want to make a supplier order clickable, we must find the file of the class associated with this element (<code>/fourn/class/fournisseur.commande.class.php</code>) then look at the name of the object class (CommandeFournisseur). | ||
: | * fk_statut fields: the fk_statut fields are used to know the status of an element. However, the number and type of status is specific to each element. The selectable choices are therefore to be added to the additional parameters of the fields. As for the <code>rowid</code>, it is therefore advisable to identify the class used to define the element and add the states that you want to use by separating them with #. | ||
* | ** example for tickets: Ticket:/ticket/class/ticket.class.php:0#1#2#3#5#7#8#9 ) | ||
** | ** for invoices, there is a specific value "P" for the "paid" status of the invoice ( Invoice:/compta/facture/class/facture.class.php:0#1#2#P ) | ||
** | |||
{| class="wikitable" | {| class="wikitable" | ||
| [[file:mylist_Exemple_champs.png|600px]] | | [[file:mylist_Exemple_champs.png|600px]] | ||
| style="vertical-align:top;" | | | style="vertical-align:top;" | Finish creating the fields on the model opposite | ||
|} | |} | ||
To make the list accessible from the Dolibarr menus, you just need to modify the list to make it active. | |||
{{Note|Before making the list active, you can display it with its query using the menu link '''Patas-M Tools > MyList'''. | |||
{{Note| | This trick only works on lists that are not yet activated.}} | ||
[[file:mylist_Liste_test.png|600px]] | [[file:mylist_Liste_test.png|600px]] | ||
{| class="wikitable" | {| class="wikitable" | ||
| [[file:mylist_Liste_affichee.png|600px]] | | [[file:mylist_Liste_affichee.png|600px]] | ||
| style="vertical-align:top;" | | | style="vertical-align:top;" | Once the list is activated, it will appear from the links defined on its creation page. | ||
The '''Export to CSV''' button allows you to export the results of the list in CSV format for external processing. It is necessary to have activated the export functionality in the "Configuration" and in the settings saved during the "Fields on the list creation page". | |||
|} | |} | ||
{| class="wikitable" | {| class="wikitable" | ||
| [[file:mylist_Liste_test.png|600px]] | | [[file:mylist_Liste_test.png|600px]] | ||
| style="vertical-align:top;" | | | style="vertical-align:top;" | If you have set the list to display it in the tab of a card, the results will be filtered according to the element. | ||
{{Note| | {{Note|Filtering the display of the list results requires the presence of a condition in its SQL query. If none is present, add for example WHERE <nowiki>1 = 1</nowiki> }} | ||
|} | |} | ||
< | <span id="Autres_fonctionnalités"></span> | ||
== | ==Other Features== | ||
=== Tab in the element === | |||
It is possible to display a myList as a tab of an element | |||
for this it is necessary to use in the SQL query a particular alias for the table associated with the element | |||
{| class="wikitable" | {| class="wikitable" | ||
|- style="background-color:orange; font-weight:bold;" | |- style="background-color:orange; font-weight:bold;" | ||
| prefix | | prefix | ||
| Element | | Element | ||
|- | |- | ||
| e | | s | ||
| Stock ( | | Third party (company) | ||
|- | |||
| p | |||
| Product | |||
|- | |||
| e | |||
| Stock (warehouse) | |||
|- | |||
| p | |||
| Project | |||
|- | |- | ||
|p | |||
|p | |||
| Propal | | Propal | ||
|- | |- | ||
| | |c | ||
| | | order | ||
|- | |- | ||
| | | f | ||
| | | Invoice | ||
|- | |- | ||
| ff | |pf | ||
| | | Price request | ||
|- | |||
| cf | |||
| supplier order | |||
|- | |||
| ff | |||
| Supplier invoice | |||
|} | |} | ||
< | <span id="Import_d'une_liste"></span> | ||
=== | ===Importing a list=== | ||
It is possible to save a list and the settings of its fields by importing an '''XML''' file. | |||
{{Note|List examples are provided with the MyList module in the XMLsample folder}} | |||
{{Note| | |||
{| class="wikitable" | {| class="wikitable" | ||
| [[file:mylist_Import.png|600px]] | | [[file:mylist_Import.png|600px]] | ||
| style="vertical-align:top;" | | | style="vertical-align:top;" | From the page '''Patas-M Tools > MyList > Import a list''', paste the XML file in the input area and click on the button '''Start import'''. | ||
Activate the list from its file and it will be accessible from your Dolibarr menus | |||
|} | |} | ||
Activate the list from its file and it will be accessible from your Dolibarr menus. | |||
===Processing queries=== | |||
In addition to the list display query, a processing query can provide the possibility of performing new actions, always from SQL queries. | |||
{| class="wikitable" | {| class="wikitable" | ||
| [[file:mylist_Fiche_liste_traitement.png|600px]] | | [[file:mylist_Fiche_liste_traitement.png|600px]] | ||
| style="vertical-align:top;" | | | style="vertical-align:top;" | Let's start with a list of contacts and add in the field '''Processing request'' the line <code>DELETE FROM 'llx_socpeople' WHERE rowid=#ROWID#</code> allowing their deletion. | ||
|} | |} | ||
{| class="wikitable" | {| class="wikitable" | ||
| [[file:mylist_Liste_traitement.png|600px]] | | [[file:mylist_Liste_traitement.png|600px]] | ||
| style="vertical-align:top;" | | | style="vertical-align:top;" | Change one of the fields to save it as checkable. The list will then become as shown opposite. | ||
The checkboxes will be used to select the results of the list to which to apply the treatment indicated in the query. In our example, the selected contacts will be deleted from the database. | |||
|} | |} | ||
===Selecting fields when displaying lists=== | |||
{| class="wikitable" | {| class="wikitable" | ||
| [[file:mylist_Datatables.png|600px]] | | [[file:mylist_Datatables.png|600px]] | ||
| style="vertical-align:top;" | | | style="vertical-align:top;" | By activating DataTables in the "Configuration", you can choose the columns of the list to display or not by checkboxes from the button '''Other columns''' | ||
|} | |} | ||
==Frequently Asked Questions== | |||
==Questions | ===General Issues=== | ||
=== | This chapter lists the difficulties encountered with the module. You will therefore find some answers there regarding its use. | ||
If you encounter an error other than those described below when using this module: | |||
#Disable and reactivate the module, | |||
# | #Check on the ChangeLog if a new version has been published, | ||
# | #Re-install/update the module, | ||
# | #Check that replacing native Dolibarr files is not necessary for the module to function properly. | ||
# | #Check that no incompatibility with another module is indicated. If necessary, follow our recommendations. | ||
# | |||
If, despite these manipulations, the error persists, contact us using the dedicated form (http://docs.patas-monkey.com/support/). | |||
===List results are not what you expected=== | |||
= | :The best way to ensure the quality of your SQL query is to query your database directly via phpmyadmin or equivalent software. Adapt the list query to paste it into the phpmyadmin SQL area. If the results are the same as the list, review your query. | ||
: | Otherwise, myList may have a bug. Contact us! (docs.patas-monkey.com/support). | ||
===Your lists do not appear/no longer appear in your menus=== | |||
=== | |||
Following an update of the module or the lists themselves, even if your lists indicate that they are activated, you will have to reactivate them by entering the Active field in edit mode and saving again. | |||
{| class="wikitable" | {| class="wikitable" | ||
| [[file:Mylist-reload-list.png|400px]] | | [[file:Mylist-reload-list.png|400px]] | ||
| style="vertical-align:top;" | | | style="vertical-align:top;" | | ||
It is also possible to reload all the lists from the list of lists with the following button | |||
|} | |} | ||
===Error message when launching myList === | |||
{| class="wikitable" | {| class="wikitable" | ||
| | | Error message '''DB_ERROR_NOSUCHFIELD or DB_ERROR_NOSUCHTABLE''' | ||
[[file:Mylist-erreur.png|600px]] | [[file:Mylist-erreur.png|600px]] | ||
| style="vertical-align:top;" | | | style="vertical-align:top;" | | ||
You have indicated in your query a field or a table that does not exist in your database or that is not identifiable. | |||
Review your SQL query. This is often a typo or bad linking in your query. | |||
The content of the message will help you identify the error with the lines '''Return code last access to database in error and Information on last access to database in error'''. | |||
|} | |} | ||
===Deleted List Still Present=== | |||
=== | You deleted the list without disabling it first. Mylist can no longer delete the list: you will need to clean your database by deleting the list from the llx_mylist table from phpmyadmin. | ||
===Error Message When Creating the List=== | |||
===Message | If you have upgraded MyList from an older version, you may encounter an error message when creating a list. | ||
To fix it, you will need to perform the following query on your database: <code>ALTER TABLE `llx_mylist` CHANGE `model_pdf` `model_pdf` VARCHAR(255) NULL DEFAULT NULL;</code> | |||
Dernière version du 15 janvier 2025 à 17:27
Presentation
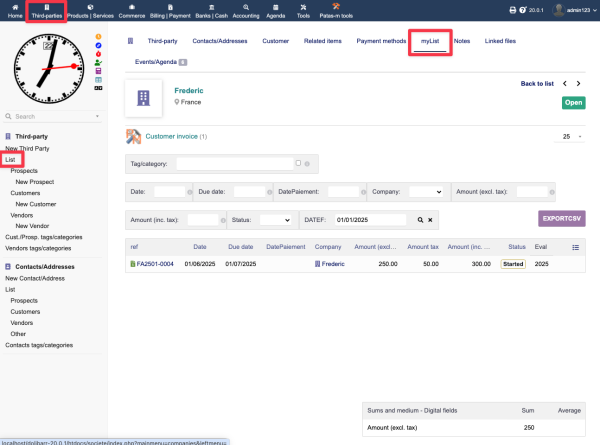
The myList Module allows you to create your own personalized lists from the information contained in your database and make them accessible from the Dolibarr menus. The information is retrieved by SQL query.
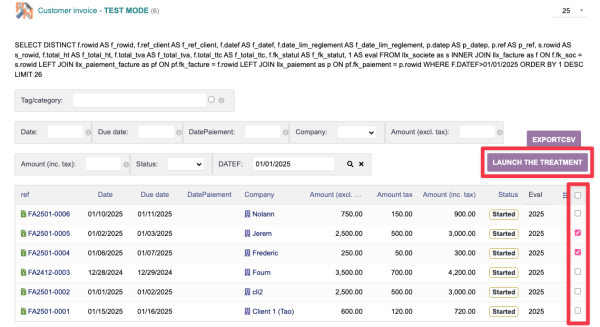
From the custom lists, different actions can be performed from additional processing requests (deletion, update, etc.).
MyList comes with three list import files to inspire you to create your own lists: contacts to call back, list of unpaid invoices and turnover.
myList also includes:

|
Sums and averages of the calculated fields of myList on screen and on edition |

|
PDF editions |
myList also includes two new field types that allow the display of a tooltip of additional field values from a list or dictionaries.
Configuration of the module features
Configuration
The module configuration is done from the modules administration page accessible via the menus Home > Configuration > Modules by clicking on the icon ![]() or
or ![]() at the end of the line.
at the end of the line.
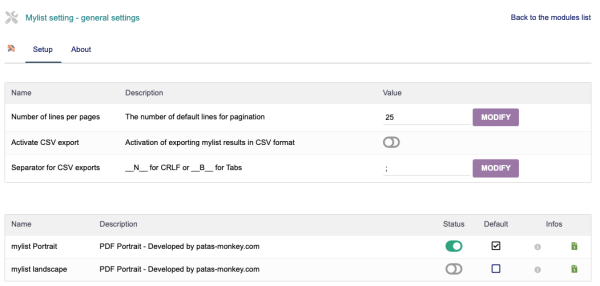
The myList module configuration page contains the settings provided by myListMore. Mylistmore therefore does not require any specific settings.
https://www.youtube.com/watch?v=1ZKnTFTGxfM
Permissions
Access to the module's features can be restricted to existing users and groups or those created after the module's installation. Click on the – to add a permission. A granted permission is symbolized by a green check mark (![]() ).
).
- User and group permissions

|
Access to the module's features can be restricted to users and groups, from their profile then Permissions tab, according to the permissions |
- Default permissions

|
The default permissions (Home > Configuration > Security > Default permissions), granted to any user created after the installation of the module, if he is not added to a group, are the following |
Getting started
The features of myList are accessible from the main menu tab Patas-M Tools. The features of MyListMore are added to those of MyList when creating new lists. Your secondary menu then presents the following menu entries:
Creating a list
Open the list creation page from the menu link Patas-M Tools > Mylist > New list:
Example of creating a simple list
Creation page
For the example, let's create a list of products and services displaying their selling price, cost and PMP, accessible from the main Products/Services menu:
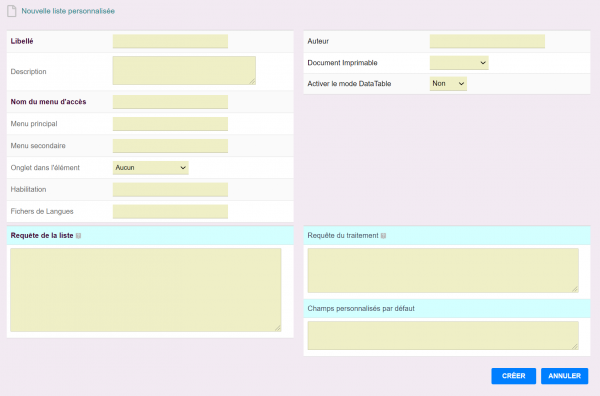
|
Open the page for creating a new list and enter the data opposite, then complete the first step of creating the list by clicking on the Create button | ||
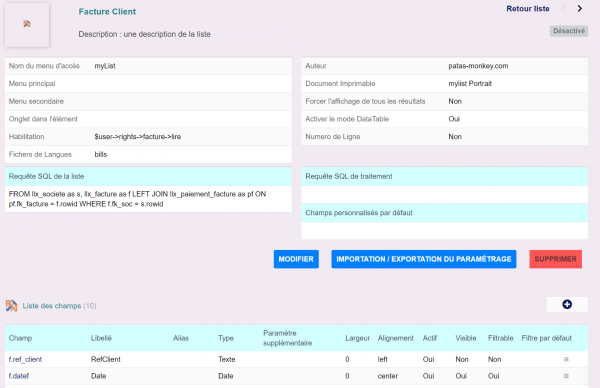
|
Once the list is created, three new fields are displayed and can be modified when editing the form:
|
There are three buttons at the bottom of the screen:
- Modify will allow you to edit the list to modify the query or any other element (access menus, display tabs, etc.)
- Import / Export the page will generate the XML file that you can modify before copying it to export it
- Delete will erase the list from your database. Always deactivate a list before deleting it. If you delete it without having deactivated the list beforehand, it will remain present in your database and on your interface, but emptied of its content|warn
List fields
From the list screen, it is possible to create fields, click on the New field button or the (+) icon at the end of the title:
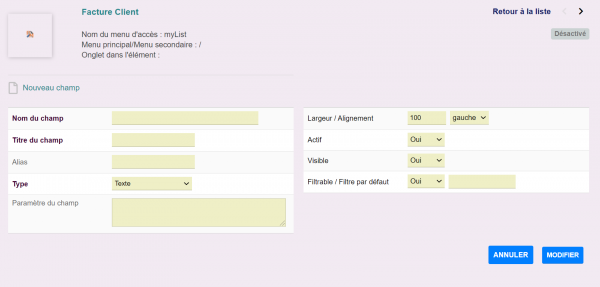
|
|
List of possible types
- Text: displays the field in text format
- Price: displays a number using the precision format defined in Dolibarr
- Percentage: displays a number as a percentage
- Date: displays a date in "day" format
- Duration: displays the numeric value in time format (e.g. the value 7200 will be displayed as 2:00)
- Boolean: displays a yes or no in the cell of the line
- Status/State: corresponds to the format of the statuses of the elements (be careful, this type requires additional configuration
- List: Displays the content of the field but also a filter list
- List type extrafield: to highlight the value of an additional field on the sheets on a myList, select this type of field. Its parameter will then be
ElementName:FieldName. For example, to display the content of the extrafieldextrafieldrecorded on a product sheet, enterproduct:extrafield. - Eval: allows you to enter in the parameters a php code which uses the dol_eval function of the additional calculated fields
depending on the type of fields created, other fields may appear for modification.
| The fields below only apply to price or number type fields. |
- Field Totalization: Will display a table with the totals of the fields for which the feature has been enabled.
- Field Average: Will display a table with the averages of the fields for which the feature has been enabled.
Field Setting
This feature is related to the setting of key type fields (rowid and fk_xxx) for list fields of type text, list and status.
It allows you to make it clickable and/or filterable by drop-down list.
Feeding this field requires knowledge of the tables and the organization of the classes of the different elements of Dolibarr. Some examples of parameter formation:
- 1st case: list from a table
Table: c_typent (without the prefix)
Key: id
Label: libelle
Parameter to indicate in the configuration of the myList field: c_typent:id:libelle
- 2nd case: make the list results clickable
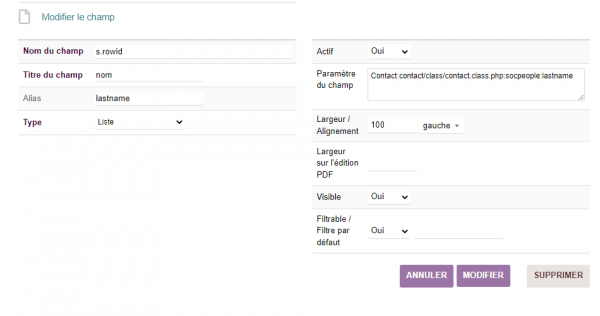
Example of entering a clickable field for contacts |
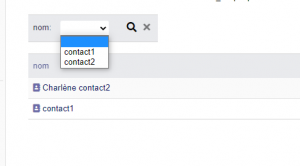
Result displayed for the example opposite for contacts |
- Most frequently used parameters:
- Third party:
Company:/company/class/company.class.php - Contact:
Contact:/contact/class/contact.class.php - Users:
User:/user/class/user.class.php:user:lastname - Product:
Product:/product/class/product.class.php - Sales proposal:
Propal:/comm/propal/class/propal.class.php - Customer order:
Order:/order/class/order.class.php:order:ref - Customer invoice:
Invoice:/accounting/invoice/class/invoice.class.php - Project:
Project:/project/class/project.class.php - Tasks:
Task:/project/class/task.class.php - Contract:
Contract:/contract/class/contract.class.php - Intervention:
Fichinter:/fichinter/class/fichinter.class.php - Shipping:
Shipping:/shipping/class/shipping.class.php - Supplier order:
SupplierOrder:/supplier/class/supplier.order.class.php - Supplier invoice:
SupplierInvoice:/supplier/class/supplier.invoice.class.php - Warehouse:
Warehouse:/product/stock/class/warehouse.class.php - Event:
ActionComm:/comm/action/class/actioncomm.class.php - Bank:
Account:/compta/bank/class/account.class.php - Category:
Category:/categories/class/categorie.class.php
- Third party:
- for text type fields containing a url, it is possible to make them clickable by adding the "url" parameter
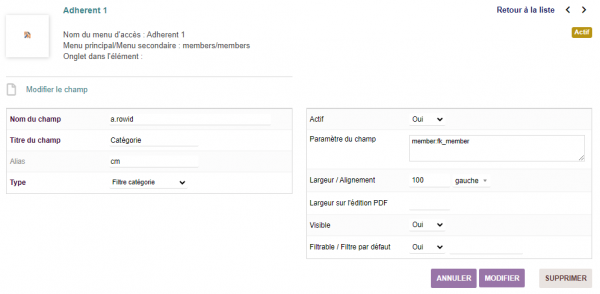
Category type field
for category type fields, the following settings must be made:
|
Here are some other examples of category parameters:
|
|
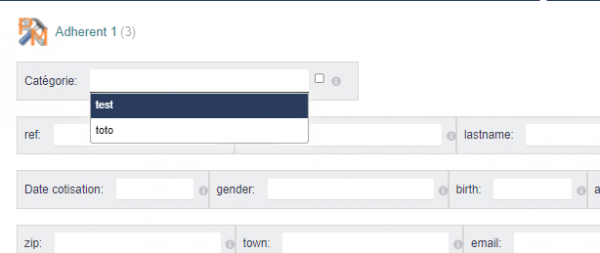
It is then possible to select several categories for filtering.
If you use the check mark, filtering several categories will be done by OR instead of AND
|
Field filtering
- Filtering options on field values.
Duration, Number, Sum, Price Result < 20000 numbers < and = to 200000 200000-300000 numbers from 200000 to 300000 inclusive Date 2008 all dates of 2008 from 01/01 to 31/12 inclusive 2006-2009 all dates from 01/01/2006 to 31/12/2009 inclusive >2004 all dates greater than (or =) 01/01/2004 20060401 All items corresponding to the day entered in YYYYMMDD format
- Boolean, List, Status: in the case of a Boolean filter, three values can be selected in the list:
- empty: the field is not filtered
true: selects values entered as "true"false: selects values entered as "false"- In other cases, it depends on the additional setting of the field.
- Boolean, List, Status: in the case of a Boolean filter, three values can be selected in the list:
Remarks on filtering
- A Check format zone is not filterable
- In the case of filtering by a user's company (for example to filter a list on invoices) you must use the #SOCID# value as the default value on a field containing the company key
- In the case of filtering by the default user, you must use the #USERID# value as the default value on a field containing the user key
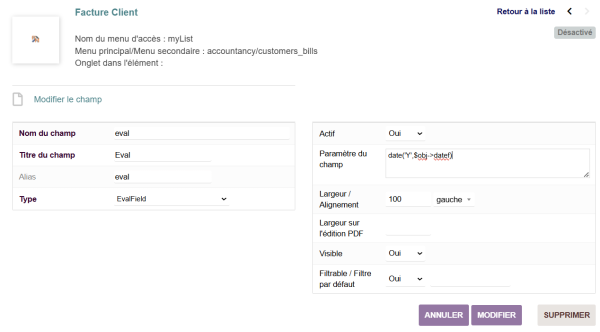
Calculated Fields
It is possible to display a calculated field in the list from php code entered in the additional parameters.
|
this type of fields uses the native operation of additional attributes (extrafields) and the dol_eval() function. |
Management of specific keys (rowid, fk_statut)
- Rowid fields: rowid fields have a particular operation in myList, associated with parameters, they allow to create a link to the element of which they are the key.
- Making a field clickable is probably the most complex problem of myList because it involves understanding a little of the Dolibarr architecture.
- First of all, it is necessary to locate in the Dolibarr directories where the class of the element that we want to call is located and what it is named in the file
- If, for example, we want to make a supplier order clickable, we must find the file of the class associated with this element (
/fourn/class/fournisseur.commande.class.php) then look at the name of the object class (CommandeFournisseur).
- fk_statut fields: the fk_statut fields are used to know the status of an element. However, the number and type of status is specific to each element. The selectable choices are therefore to be added to the additional parameters of the fields. As for the
rowid, it is therefore advisable to identify the class used to define the element and add the states that you want to use by separating them with #.- example for tickets: Ticket:/ticket/class/ticket.class.php:0#1#2#3#5#7#8#9 )
- for invoices, there is a specific value "P" for the "paid" status of the invoice ( Invoice:/compta/facture/class/facture.class.php:0#1#2#P )

|
Finish creating the fields on the model opposite |
To make the list accessible from the Dolibarr menus, you just need to modify the list to make it active.
| Before making the list active, you can display it with its query using the menu link Patas-M Tools > MyList.
This trick only works on lists that are not yet activated. |
|
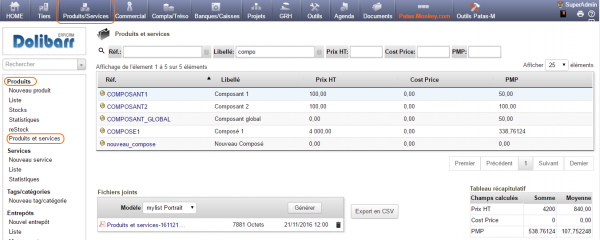
Once the list is activated, it will appear from the links defined on its creation page.
The Export to CSV button allows you to export the results of the list in CSV format for external processing. It is necessary to have activated the export functionality in the "Configuration" and in the settings saved during the "Fields on the list creation page". |
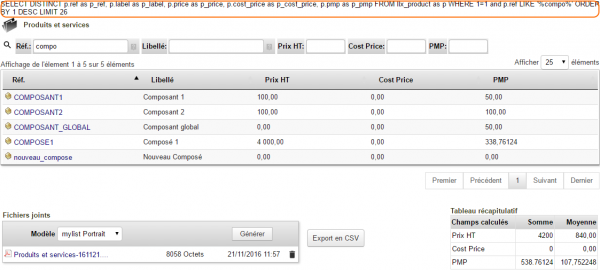
|
If you have set the list to display it in the tab of a card, the results will be filtered according to the element.
|
Other Features
Tab in the element
It is possible to display a myList as a tab of an element for this it is necessary to use in the SQL query a particular alias for the table associated with the element
| prefix | Element |
| s | Third party (company) |
| p | Product |
| e | Stock (warehouse) |
| p | Project |
| p | Propal |
| c | order |
| f | Invoice |
| pf | Price request |
| cf | supplier order |
| ff | Supplier invoice |
Importing a list
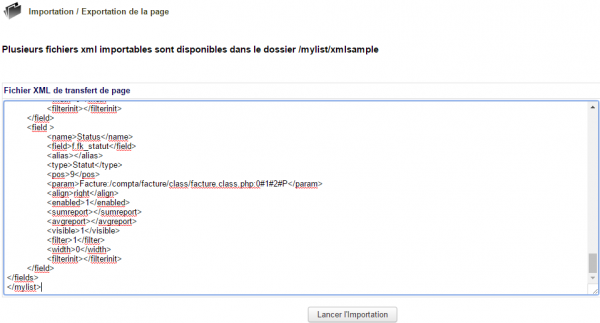
It is possible to save a list and the settings of its fields by importing an XML file.
| List examples are provided with the MyList module in the XMLsample folder |
|
From the page Patas-M Tools > MyList > Import a list, paste the XML file in the input area and click on the button Start import.
Activate the list from its file and it will be accessible from your Dolibarr menus |
Activate the list from its file and it will be accessible from your Dolibarr menus.
Processing queries
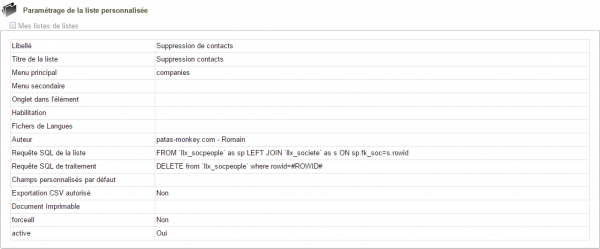
In addition to the list display query, a processing query can provide the possibility of performing new actions, always from SQL queries.
|
Let's start with a list of contacts and add in the field 'Processing request the line DELETE FROM 'llx_socpeople' WHERE rowid=#ROWID# allowing their deletion.
|
|
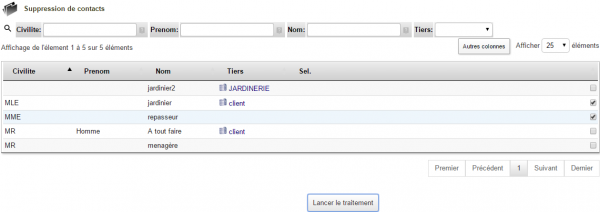
Change one of the fields to save it as checkable. The list will then become as shown opposite.
The checkboxes will be used to select the results of the list to which to apply the treatment indicated in the query. In our example, the selected contacts will be deleted from the database. |
Selecting fields when displaying lists
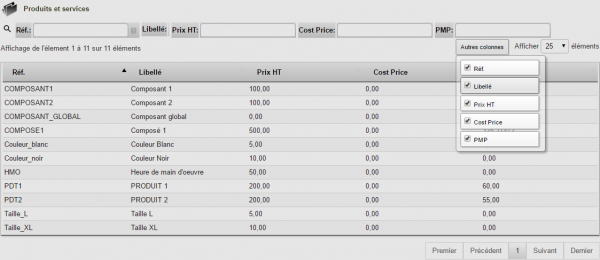
|
By activating DataTables in the "Configuration", you can choose the columns of the list to display or not by checkboxes from the button Other columns |
Frequently Asked Questions
General Issues
This chapter lists the difficulties encountered with the module. You will therefore find some answers there regarding its use. If you encounter an error other than those described below when using this module:
- Disable and reactivate the module,
- Check on the ChangeLog if a new version has been published,
- Re-install/update the module,
- Check that replacing native Dolibarr files is not necessary for the module to function properly.
- Check that no incompatibility with another module is indicated. If necessary, follow our recommendations.
If, despite these manipulations, the error persists, contact us using the dedicated form (http://docs.patas-monkey.com/support/).
List results are not what you expected
- The best way to ensure the quality of your SQL query is to query your database directly via phpmyadmin or equivalent software. Adapt the list query to paste it into the phpmyadmin SQL area. If the results are the same as the list, review your query.
Otherwise, myList may have a bug. Contact us! (docs.patas-monkey.com/support).
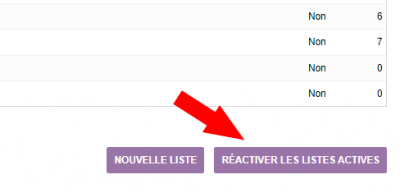
Following an update of the module or the lists themselves, even if your lists indicate that they are activated, you will have to reactivate them by entering the Active field in edit mode and saving again.
|
It is also possible to reload all the lists from the list of lists with the following button |
Error message when launching myList
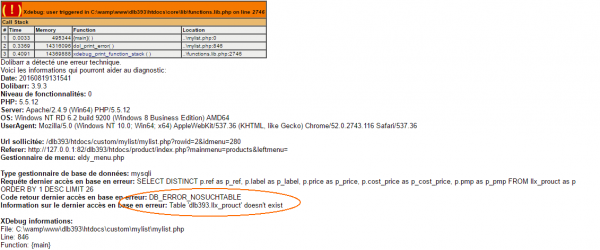
| Error message DB_ERROR_NOSUCHFIELD or DB_ERROR_NOSUCHTABLE |
You have indicated in your query a field or a table that does not exist in your database or that is not identifiable. Review your SQL query. This is often a typo or bad linking in your query. The content of the message will help you identify the error with the lines Return code last access to database in error and Information on last access to database in error. |
Deleted List Still Present
You deleted the list without disabling it first. Mylist can no longer delete the list: you will need to clean your database by deleting the list from the llx_mylist table from phpmyadmin.
Error Message When Creating the List
If you have upgraded MyList from an older version, you may encounter an error message when creating a list.
To fix it, you will need to perform the following query on your database: ALTER TABLE `llx_mylist` CHANGE `model_pdf` `model_pdf` VARCHAR(255) NULL DEFAULT NULL;
